
- A to Z basic gear and equipment set up
- Field tested, unbiased product reviews, tips, and advice
- Educational and safety information
- Credible resources and links-videos from industry experts
NOTE: We are not paid to provide our opinion. The information posted on this page comes directly form FCFF's lifetime of in-field experiences, or from what FCFF believes to be the most credible resources in the industry. Don't see what you are looking for, please feel free to contact FCFF directly...we are always happy to help!
Page Contents:
1. Lines
2. Leaders and Tippets
3. Hook Sizes
4. Rods
5. Reels
6. Balance: Rod, Reel, Line
7. Knots
8. Fly Fisherman's Code and Fly Fishing Safety
1. Fly Line
When I teach an E.I. Fly™ course, I emphasize the need to balance the combination of your fly line, rod and reel. Specifically, I feel the most important aspect of any fly rod set-up is the fly line design and its physical properties. For the beginner, it starts with a basic understanding of the weight difference between monofilament and fly fishing lines; how the weight of the fly line is designed to produce flex in the fly rod vs. the weight of the lure creating flex in a spinning rod. You don't hear much talk about fly lines, but experts agree, to achieve a great casting stroke, it has very little to do with the rod or reel. The use of the highest quality fly line, combined with sound casting mechanics, is the key to becoming a successful fly caster.
To get you moving in the right direction, legendary casting champion and instructor Joan Wulff defines the fly-casting stroke as:
 Unlike monofilament, it’s the core of the fly line that determines the tensile strength, as well as how much it stretches and the general stiffness of the line (or lack of stiffness). As a general rule, all cores are built to be much stronger than the heaviest tippets that are used with them. For example, a 3 weight floating line may have a break-strength as much, if not more, than 20lbs. Heavy fly lines such as 10Wt. may have a break strength well over 50lbs. Chances are, the leader and tippet will break off 99.9% of the time before your fly line will. With respect to stretch, it’s important that a fly line core have the right amount of stretch. Not enough stretch and the line may develop memory problems. Too much stretch and the fly line may become mushy and difficult to control. Lastly, the stiffness of the core will determine the action of your fly-line. For example, lines intended for tropical fishing are designed to withstand high heat extremes. Equally, lines developed for more temperate water are made with cores that are less stiff. This reduces the problem of line memory that occurs when stiff line meets cold waters.

 As seen to the left, sinking lines have a high-density material built into their coatings, thus, allowing the lines to sink in water. Generally speaking, manufactures use powdered tungsten because it is denser and more environmentally friendlier than lead (though lead core lines are still available). By controlling the amount of metal powder added to the line, the manufacture can set the sink rate per line. For example, a sink line can sink 1.0 inch per second, or +10 seconds per minute. Lastly, since the line sinks and you cannot see it, nor do you want the fish to see it, colors are often brown or grey.
The fly line’s shape or taper determines how energy is transmitted and dissipated during casting. By varying the lengths and diameters of the various parts of the line, specific performance attributes can be accentuated.
Parts of the Taper

1. Tip: a short 6-12 inch level section where you attach your leader. This section is to protect the lines taper. Since many anglers cut off a small part of the fly line when they change leaders, the tip allows these changes without shortening the front taper and altering the way the line casts.
2. Front Taper: this section of the line determines how delicately or powerfully the fly is delivered. Typically, 4-8 feet long, the Front Taper decreases in diameter from the Belly section to the Tip. This graduation of the line’s mass (weight) determines its ability to transfer your casting energy.
3. Belly: because it’s the widest diameter and longest length, this section is where most of the weight of a line is located, and, consequently, where your casting energy is carried.
4. Rear Taper: decreasing in diameter from the thicker Belly section to the much smaller diameter running line section, the rear taper creates the transition so important to smooth casting.
5. Head: a term used to describe the combination of parts (front taper, belly and rear taper).
6. Running Line: typically a much smaller diameter from the belly, this section of line has been designed to make casting distance easier.
 Level Fly Line (L): are the easiest to understand and the least used. A fly line that has a level taper, in essence has no taper. A level taper fly line is of uniform weight and width for its entire length (+/- 75 ft). In other words, it has one diameter (thickness). Level lines float extremely well due their constant weight and width, but are much difficult to cast and control. Delicate fly presentation may be difficult because the line tends to splash on the water during a cast. Further, level lines do not shoot as well, thus, limiting your ability to make longer cast. Take Away: Low Performance features. It transfers energy erratically and is hard to control while casting. The best function of the level lines is in the form of fine diameter shooting lines or sinking lines to be cut up for tips for custom lines.
 Weight forward (WF): The line has extra weight and width (diameter) built into it the front potion of the line. Taper design can vary by Manufacturer and targeted species. But generally speaking, a WF taper is about 30 feet in length, with a short belly and short back taper followed by 60 feet of thin diameter level line. The advantages of the WF line: works over a wide range of conditions. Casts ranging from 20-100 feet with normal size flies. More effective line to cast in windy conditions. Take Away: easy to false cast and good for long cast.
Special Note WF Lines: because the extra weight and width are on one end of the fly line, it is crucial that the line be put on correctly. Today, almost all manufacturers will assist you in this process by adding a tag(note) on the line. A WF line cannot be reversed. Lastly, any line whether floating or sinking which has a “head” and “running line” section which are seamlessly joined can be termed a WF fly line. For example: Rocket Tapers, Saltwater Tapers, Steelhead Tapers, Triangle Tapers, and Teeny are well WF fly lines.
 Double Taper (DT): Historically speaking the DT fly line was the most popular line at one time, and the fly line of choice for trout fisherman. DT lines are perfectly balanced; both ends of the fly line weigh the same and each end gradually increases in width and weight the closer it gets to the middle section of the fly line at an equal rate. Thus, due to identical tapers at each end, the DT line is reversible. If one end becomes worn, simply switch ends. Specifically, the DT line is 90 feet long. The first 15 feet of the line, from one end, gradually thickens . Thereafter, the line maintains its diameter throughout the belly for 60 feet. Upon the last 15 feet of line, the DT line gradually decreases in thickness (at an equal rate of the front taper) till it reaches the end point. Take Away: designed to make short/medium cast at 20-50ft. The belly of the line makes this line difficult to shoot line (you must make more false cast with line over 30ft). Advantages: Easy to mend and roll cast due to weight of line in belly section. Great line for dry fly delicate presentations.
 Shooting Taper (ST): Also, called Shooting Heads, were originally designed for fly-casting distance tournaments. Like the WF line, the front portion of the ST line (or, commonly called the head) has 30 feet of heavier weighted line. The remaining running line is uniformed in diameter and weight, but is much thinner than a traditional WF fly line. The “Head” is joined to the shooting line by a loop-to-loop connection. The purpose of this configuration is to reduce air resistance, and reduce friction in the rod guides. Take Away: Great for long cast +100f feet (world record over 200 feet). Can be highly effective in strong wind conditions (Ocean, Patagonia, etc). Disadvantages: delicate fly presentations are almost impossible. Line control is challenging. thin running line tends to coil and gets knotted up. To avoid these known issues, many experienced Anglers use stripping baskets.
 Teeny Taper (TT): Developed by Jin Teeny, this taper does not have a front taper and has a smaller than normal running line (similar to a shooting taper/head). The taper is designed to be very fast sinking…think deep fast water.
Standard Line Weights
Tip: The sooner you start thinking and talking in grains, in the long run, the better your fly line knowledge will be. Why? Experts and most of the world other than the USA, speak and label products in grains.
Advice from the Experts
How To Choose the Right Fly Line Weight. By Lefty Kreh.
3. Hook Size

The size of the hook is simply determined by the width of the gape (the measurement between the shank and the point).
Initially, the system may seem confusing, but always remember to start at zero. As you progress up in the numerical numbers (1, 2, 4, 6, 8, 10, 12, 14,16,18, 20, 22, 24, 26, 28, 30, 32) the gape becomes smaller, thus the hooks become smaller. As you decrease from zero (1/0, 2/0, 3/0, 4/0, 5/0, 6/0, 7/0, 8/0, 9/0,10/0,11/0,12/0,13/0,14/0,15/0,16/0,17/0,18/0) the hook gape becomes wider, thus the hooks become larger (not necessarily longer).
By now, in the above chart, you'll see how smaller or larger hooks match up with smaller or larger diameter leaders and tippets. For example, you would never match a size 2 hook with an 8X leader. Why? the diameter of the 8X tippet will not be strong enough to cast or turn-over the larger fly. Thus your casting and presentation will suffer, if not be impossible; and the likelihood of your tippet breaking increases significantly. Try it on the water...you'll understand immediately!
The 'X' Factor: Strength and Length
Your at the fly shop and you see hooks labeled Size 2, 2X/2XL or Size 4, 2X/4XL...now you are really confused. To keep things simple, all this means is the hook is stronger and has a longer shank (when compared to standard hooks noted in the above graph). To be a bit more precise, 2X simply means the hook has a thicker-stronger diameter; and the 2XL simply means the length of the shank is two times the length of a standard hook. Applications for stronger and longer hooks usually means you fishing deep for bigger fish (large streamer flies).
Converting from the world of lurers, worm and bobbers, and 8lb test line, will take some time. But once you master it, you'll soon realize how simple and effective it is.
4. Fly Rods
By now you understand how fly lines, and matching leader-tippet to hook size are extremely important. In my opinion, the next most important step is your purchasing your fly rod. Where to start? I will approach this as though you are a beginner and you are looking for a well balanced 'starter' rod.
Design: Each fly rod has been designed to cast a specific line weight. For example: a six weight fly rod has been designed to cast a six weight fly line. The chart below is a guideline, not a rule, for balancing rod-weight, and fly size.
Length: Single hand fly rods range from 6ft to 10ft. Two handed rods (commonly called switch and spey) range from +/- 11ft to +/- 15ft. A typical starter, all purpose single hand rod, designed to fish for trout or bass, is a 9 ft 5 or 6 weight. For local New England waters, I would pick a 9ft 5wt. Now what 'Action or Flex," do you pick?
Action: Not all rods are the same. Each material (bamboo, fiberglass, graphite, boron) possesses physical properties which, along with proprietary manufactured tapered designs, determines the characteristics of a fly rod performance. Plus, there are entry level rods, and high end rods with both fast, medium, and slow actions. Each manufacturer has their own action indexing system and as a result, there is no set standard for measurement. For Example: An Orvis 9 ft 5 wt Helios fast action rod will feel and perform differently than a Scott S4 9ft 5wt fast action rod. Before I dive deeper into this discussion, just what are I am talking about when I use the word 'Action,' or "Flex.'
In the fly rod industry, when we use of the word 'Action or Flex,' we are referring to the bend of the rod. Technically, 'action' is defined as the relative resistance to bending as you move down the length of the fly rod shaft. The below picture clearly shows the 'bend' of a fly rod designed to be fast, medium or slow.

Let's take a closer look at the available 9ft 5wt actions:
Fast Action or Tip-Flex: due to the specific tapered design of the blank, these rods bend less, and are stiffer. Plus, they don't call them 'tip-flex' for nothing. In other words, the rod is designed to flex only from the tip-top to about 1/3 down the rod. As a result, when you catch a fish, the rod's butt and mid-section do the work for you, and your ability to feel and play the fish is entirely different from medium and slow actions rods. However, fast action rods tend to cast farther and have become the most popular action-type rod on the market today (both with beginners and advance fly fisherman). The stiffness of these rods will help you mend and pick up line easier, create tight loops with ease, create higher line speeds allowing you to punch line through strong winds, make longer cast in almost all situations with greater ease, and significantly increase your ability to cast larger flies and heavier weighted fly lines. In other words, with moderately correct casting form, the rod does much of the work for you. In Patagonia Argentina, where sustained winds of 25mph are the norm, a fast action rod, such as a 9.6ft 6wt, is a MUST have!
Medium Action or Mid-Flex: these rods bend more than fast action rods, and generally flex from the tip-top to the middle portion of the rod, or generally the 2/3 mark down the rod.The remaining 1/3 of the rod, from about +/- the middle of the rod to the rod butt, will provide the angler with a stiff feel which aides in casting and fighting fish. Despite fast action rods being the most popular, the medium action rod, in my opinion are the most versatile fly rods on the market. In the hands of a competent caster, you can do everything a fast action rod can do. If you prefer slower line speed for subtle dry-fly presentations, and a forgiving tip which allows you to play the fish and avoid tippet breaks, then I would highly recommend a medium action rod.
Slow Action or Full-Flex: Though manufacturers make slow action graphite rods, historically, when it comes to slow action rods, we tend to think bamboo and fiberglass. Now think very slow line speed and ultra sensitive tip-top protective action. A sensitive tip-top action will absorb strikes and prevent fine tippet, such as 8X, from breaking. A slow action rod is used by many small stream dry-fly fisherman who prefer delicate short distance casts looking to feel the action of a fighting fish from the tip-top of the rod, to his/her hands. However, there are a handful of old school purist who will, for example, purposely use a 9ft 9wt slow action rod (mostly for saltwater fishing because when you use heavier lines and flies, your casting stroke changes and a slower action rod enhances performance).
Note: Learning on a slow action rod, in my opinion, can be very challenging for a beginner. Why? To obtain optimal fly line and fly rod performance, an angler must be consistently patient and develop timing (as seen in a River Runs Through It). Personally, I grew up fishing a 9ft 6wt slow action fiberglass rod. As a youth, I hated it...I wanted instant gratification. But, it was the only fly rod I had, so I stuck with it. Now, as an adult, after learning how to use this tool, I cherish every moment I cast with this rod!
Final Thoughts
As a beginner, as you develop your casting stroke, it could take you several years to finally determine which flex style you prefer. To accelerate your understanding of fly rod performance, I would ask your local fly shop to provide you with a variety of rod-reel-line set-ups. If you do this make sure the rod-reel-line is properly balanced; otherwise your wasting your time. Also, don't be afraid to ask a friend to try his/her well balanced rod-reel-line. For me, I tend to favor the following actions: medium-fast, medium, and medium-slow. I also tend to line-up my rod/reel. In other words, if I am using a 9ft/5wt, I will add 6wt line to my reel and adjust the amount of backing so I don't over spool my reel (I no longer follow Mfg's guidelines for line-reel-backing amounts).

Action of Fly Reels
Drag System
Note: Before moving on, we should mention the following: a 2 lb fish in a fast moving current, with rocks and sub-merged trees, will test an angler using a light weight, e.g. medium action 4wt rod with a spring and pawl reel. Again, the choice of equipment (reels) depends on situational and personal preference factors.
It's simple, remember fly rod weight = fly line weight = fly reel weight.
Spare spools are a matter of convenience and personal preference. Most fisherman inter-change spools to change from a floating line to a sinking line. However, what most fisherman fail to realize is that 95% of their time on the water, will only require floating line (depends on waters fished). So why buy an extra spool lined with sinking line, and then carry a heavy-bulky object in your vest that you rarely use? If you find yourself in a situation that requires various types of sinking lines, then you may need a spare spool with a sinking line. Personally, I do have a spare spool (only one), but I travel the world, and I fish in highly specialized waters. Overall, let's say for trout fishing, I don't find spare spools to be a must have item. To go deep, you can lengthen your leader and simply add split-shot; or you could use inter-changeable sinking tips (Poly-Leaders, for example). The downside to these methods is the casting 'feel' stroke (it may feel clunky). As I initially stated, it's a matter of convenience and personal preference. Lastly, if you do not buy spare spools when you purchase your reel, in the future, finding a spare spool that fits your reel, might become challenging.
A reel of any sort worse enemies are salt and sand! You could use your freshwater reel in saltwater conditions, but if your real is of poor quality and you do not properly clean you reel after use, it will ultimately corrode and fail. Things to look for in a good saltwater reel: high quality parts designed to take saltwater punishment, and your reel needs to hold at last 200 yards of 30lbs backing (ocean fish are big, strong and fast!). Many high-end ($) reels today have been engineered for both sweet and saltwater. But, remember to chose the lightest weight reel possible (not the strongest drag system).
6. Balance: Rod - Reel - Line
By now, you have read information on fly lines, fly rod actions, and fly reels. Now it's time to put it all together to achieve BALANCE.
Once again, the general rule to follow is: fly rod weight = fly line weight = fly reel weight. If this is so simple, then why do I see so many anglers with un-balanced outfits?
Avoid the follow mistakes while in a store shopping for a rod, reel, line outfit:
Final Thoughts
PS. When I am walking-wading (hunting), my dry-fly rod of choice in Patagonia is a medium-slow action 4wt, with 5wt WWF line, on a 3/4 wt click-pawl reel. Many anglers think my set-up is crazy (a bit undersized for my prey), but I do just fine. See photo below.
7. Fly Fishing Knots
Saltwater Knots
A saltwater set-up (backing, fly line, leader) is identical to the set-up posted above. However, as you begin to use larger diameter monofilament fishing line, and as you tie your monofilament leader to a hook, the clinch knot, may not seat and bite properly. Therefore, the use of the clinch knot is not recommended when fly fishing in saltwater. When attaching a fly to a leader, the preferred saltwater knots generally are loop knots. Why? One, they are easier to tie and hold excellent break strength. Two, loop knots are the preferred knot when fishing flies that mimic small and large bait fish. In other words, when the fly is in the water, the open loop allows the fly to have more natural action. Just be sure to keep your loop size to a minimum. By doing so, you won't spook wary fish.

Hypothermia vs. Hyperthermia
The below information was written for 'all' possible weather conditions.
Hypothermia is a condition in which an organism's temperature drops below that required for normal metabolism and bodily functions. In warm-blooded animals, core body temperature is maintained near a constant level through biologic homeostasis. But, when the body is exposed to cold, its internal mechanisms may be unable to replenish the heat that is being lost to the organism's surroundings. Hyperthermia, in its advanced state referred to as heat stroke or sunstroke, is an acute condition which occurs when the body produces or absorbs more heat than it can dissipate. It is usually caused by prolonged exposure to high temperatures. The heat-regulating mechanisms of the body eventually become overwhelmed and unable to effectively deal with the heat, causing the body temperature to climb uncontrollably. Normal or Core Body Temperature is 36.8°C (98.2°F). Hypothermia can be divided in three stages of severity.
Three Stages of Hypothermia
Stage 1:
Body temperature drops by 1-2°C (1.8-3.6°F) below normal temperature (35-37°C or 95-98.6°F). Mild to strong shivering occurs. The victim is unable to perform complex tasks with the hands; the hands become numb. Blood vessels in the outer extremities constrict, lessening heat loss to the outside air. Breathing becomes quick and shallow. Goose bumps form, raising body hair on end in an attempt to create an insulating layer of air around the body (which is of limited use in humans due to lack of sufficient hair, but useful in other species). Often, a person will experience a warm sensation, as if they have recovered, but they are in fact heading into Stage 2. Another test to see if the person is entering stage 2 is if they are unable to touch their thumb with their little finger; this is the first stage of muscles not working.
Stage 2:
Body temperature drops by 2-4°C (3.8-7.6°F). Shivering becomes more violent. Muscle miss-coordination becomes apparent. Movements are slow and labored, accompanied by a stumbling pace and mild confusion, although the victim may appear alert. Surface blood vessels contract further as the body focuses its remaining resources on keeping the vital organs warm. The victim becomes pale. Lips, ears, fingers and toes may become blue. •
Stage 3:
Body temperature drops below approximately 32 °C (89.6 °F). Shivering usually stops. Difficulty speaking, sluggish thinking, and amnesia start to appear; inability to use hands and stumbling is also usually present. Cellular metabolic processes shut down. Below 30 °C (86.0 °F), the exposed skin becomes blue and puffy, muscle coordination becomes very poor, walking becomes almost impossible, and the victim exhibits incoherent/irrational behavior including terminal burrowing or even a stupor. Pulse and respiration rates decrease significantly, but fast heart rates can occur. Major organs fail. Clinical death occurs.
Hypothermia Treatment:
Treatment for hypothermia consists of drying, sheltering, and gradually warming (making sure to not rub the patient's body, to warm with blankets and, if possible, to transfer your own body heat). While blankets help a person retain body heat, they are not sufficient to treat hypothermia. It is vital that the core of the body is warmed first or else the cold blood will be forced towards the heart and may cause death. In the field, a mildly hypothermic person can be effectively re-warmed through close body contact from a companion and by drinking warm, sweet liquids. Moderate and severe cases of hypothermia require immediate evacuation and treatment in a hospital. In hospital, warming is accomplished by external techniques such as heated blankets for mild hypothermia and by more invasive techniques such as warm fluids injected in the veins or even washing of the bladder, stomach, chest and abdominal cavities with warmed fluids for severely hypothermic patients. These patients are at high risk for arrhythmias (irregular heartbeats), and care must be taken to minimize jostling and other disturbances until they have been sufficiently warmed, as these arrhythmias are very difficult to treat while the victim is still cold.
Wind Chill & Frost Bite:
Wind chill is the apparent temperature felt on exposed skin, which is a function of the air temperature and wind speed. The wind chill temperature is always lower than the air temperature, except at higher temperatures where wind chill is considered less important. In cases where the apparent temperature is higher than the air temperature, the heat index is used instead.
Frostbite is the medical condition whereby damage is caused to skin and other tissues due to extreme cold. At or below 0º C (32°F), blood vessels close to the skin start to narrow (constrict). This helps to preserve core body temperature. In extreme cold, or when the body is exposed to cold for long periods, this protective strategy can reduce blood flow in some areas of the body to dangerously low levels. The combination of cold temperature and poor blood flow can cause severe tissue injury by freezing the tissue. Frostbite is most likely to happen in body parts farthest from the heart and those with a lot of surface area exposed to cold. The initial stages of frostbite are sometimes called "frostnip". If frostbite is not treated immediately then the damage and the frostbite become permanent. Nerve damage will occur due to oxygen deprivation. Frostbitten areas will turn discolored, purplish at first, and soon turn black. After a while nerve damage becomes so great that feeling is lost in the frostbitten areas. Blisters will also occur. If feeling is lost in the damaged area, checking it for cuts and breaks in the skin is vital. Infected open skin can lead to gangrene and amputation may be needed.


Frost BiteTreatment:
To treat frostbite move the victim to a warm location and seek medical help. Soak frostbitten areas in warm (not hot) water or, if in wilderness, warm by contact with the skin of a non-frostbitten person. Continue until the victim has regained sensation and movement in the afflicted region; this often follows great pain as the nerves thaw. Never rub, slap, or shake the stricken region as ice crystals in the frostbitten skin will damage surrounding tissue. For frostbite in the feet, keeping feet in warm saline water will provide relief. Follow the treatment with a period of constant warmth: refreezing following thawing worsens the damage.
How to Prevent Heat Loss & Reduce Exposure to Cold/Wind:
1) Insulation: Cotton vs. Synthetic/Wool Fabrics
Wearing cotton in cool/cold weather is a particular hypothermia risk as it retains water, and water rapidly conducts heat away from the body. Even in dry weather, cotton clothing can become damp from perspiration and chilly after the wearer stops exercising. Synthetic and wool fabrics provide far better insulation when wet and are quicker to dry. Some synthetic fabrics are designed to wick perspiration away from the body. Last, poor circulation can cause heat loss. So, tight clothing or boots, cramped positions, fatigue, certain medications, smoking, alcohol use, or diseases that affect the blood vessels, such as diabetes can cause poor blood circulation.
2) Down Feathers vs. Poly-Insulate vs. Wool
When dry, down feather insulation is among the best in the world. However, when wet, down feathers will lose almost all insulation properties and take more time to dry than wool or poly- insulates such as sleeping bag material and poly-synthetics such as Polar Fleece.
3) Wind and Weather Proofing
Whether we are exposed to cold or warm weather, our number one priority is to protect our skin and insulate our bodies. You have many modern “high tech” options such as Poly/Nylon weave with a Gore-Tex type material. This type of outer shell material offers the following: strength, light weight, windproof, waterproof and breathable performance. Traditional protective clothing such as rain coats, down jackets, or heavy wool jackets work well but they all come with pro’s and con’s.
4) Layering System
For insulation and barrier protection, all outdoor enthusiast and experts agree that layering is the best method. By layering your clothes, you are able to add or subtract clothing when necessary. Ultimately, the key to a good layering system is dependent on each person’s knowledge of their own body performance in different climates, education of materials available for purchase and real world experience. For instance, Polar Fleece is available in 100, 200, 300 weight (typically, the higher the number the more insulation offered). But, a heavier weight layering system may not provide you the best insulation system available. Why? While active, a heavier weight layering system may lead to excessive perspiration may which will lead to wet clothing, which may lead to body heat loss.
Suggestions:
1. Lines
2. Leaders and Tippets
3. Hook Sizes
4. Rods
5. Reels
6. Balance: Rod, Reel, Line
7. Knots
8. Fly Fisherman's Code and Fly Fishing Safety
1. Fly Line
When I teach an E.I. Fly™ course, I emphasize the need to balance the combination of your fly line, rod and reel. Specifically, I feel the most important aspect of any fly rod set-up is the fly line design and its physical properties. For the beginner, it starts with a basic understanding of the weight difference between monofilament and fly fishing lines; how the weight of the fly line is designed to produce flex in the fly rod vs. the weight of the lure creating flex in a spinning rod. You don't hear much talk about fly lines, but experts agree, to achieve a great casting stroke, it has very little to do with the rod or reel. The use of the highest quality fly line, combined with sound casting mechanics, is the key to becoming a successful fly caster.
To get you moving in the right direction, legendary casting champion and instructor Joan Wulff defines the fly-casting stroke as:
“The fly casting stroke is a straight-line movement of the whole rod by the rod hand, in an acceleration to a stop. During the acceleration, the weight of the fly line flexes the rod from the tip downward. When the acceleration is ended and the butt section of the rod is stopped, the limber rod tip flips over and the long flexible line continues on its path, passing over the tip, to form an open-ended unrolling loop. “ J. Wulff. Fly Casting techniques.
Line Design: The Core

The Coating: Floating and Sinking Line

The basic function of the line coating is to provide the casting weight needed to load the fly rod. Precise weight standards are set by the fly-fishing industry and manufacture associations. How does a line float or sink? The density of the line’s coating will determine whether a line will float or sink. Specifically, floating lines (as seen in photo to the left) have micro-balloons mixed into their coatings. The micro-balloons create buoyancy, thus allowing the line to float. However, if too many micro-balloons are added, this will add thickness to the line and adversely affect the lines castability properties. Manufactures also apply hydrophobic coatings on the line that are H2o resistant. These H2o coatings actually repel the water… much like car wax beads water on a car.
Sinking Lines

Taper Designs
 |
| Tapers: Level, Double, Forward, Long, Triangular, Shooting |
Parts of the Taper
1. Tip: a short 6-12 inch level section where you attach your leader. This section is to protect the lines taper. Since many anglers cut off a small part of the fly line when they change leaders, the tip allows these changes without shortening the front taper and altering the way the line casts.
2. Front Taper: this section of the line determines how delicately or powerfully the fly is delivered. Typically, 4-8 feet long, the Front Taper decreases in diameter from the Belly section to the Tip. This graduation of the line’s mass (weight) determines its ability to transfer your casting energy.
3. Belly: because it’s the widest diameter and longest length, this section is where most of the weight of a line is located, and, consequently, where your casting energy is carried.
4. Rear Taper: decreasing in diameter from the thicker Belly section to the much smaller diameter running line section, the rear taper creates the transition so important to smooth casting.
5. Head: a term used to describe the combination of parts (front taper, belly and rear taper).
6. Running Line: typically a much smaller diameter from the belly, this section of line has been designed to make casting distance easier.
Taper Types
Special Note WF Lines: because the extra weight and width are on one end of the fly line, it is crucial that the line be put on correctly. Today, almost all manufacturers will assist you in this process by adding a tag(note) on the line. A WF line cannot be reversed. Lastly, any line whether floating or sinking which has a “head” and “running line” section which are seamlessly joined can be termed a WF fly line. For example: Rocket Tapers, Saltwater Tapers, Steelhead Tapers, Triangle Tapers, and Teeny are well WF fly lines.
Standard Line Weights
AFTMA the former American Fishing Tackle Manufacturers Associations -- now the ASA -- American Sportfishing Association states: Fly Line Standards were developed to help fly fishing tackle manufacturers create a system that would match fly line weight to fly rod performance. Cortland Line Company’s Leon Chandler was instrumental in initiating and completing the project. In theory, this would standardize fly tackle manufacturing across the industry and enable fly fishers to select and balance their equipment for optimum performance.
The system uses the weight in grains (a very small weight measure of the first 30 feet of fly line as a standard). The table below shows fly line weight designations and their grain weight. The system also established a tolerance level that is acceptable. (Copied from Cortland Line Company website).
Number Designation
|
Standard Weight
|
Margin For Error
|
1-Weight
|
60
|
54-66
|
2-Weight
|
80
|
74-86
|
3-Weight
|
100
|
94-106
|
4-Weight
|
120
|
114-126
|
5-Weight
|
140
|
134-146
|
6-Weight
|
160
|
152-168
|
7-Weight
|
185
|
177-193
|
8-Weight
|
210
|
202-218
|
9-Weight
|
240
|
230-250
|
10-Weight
|
280
|
270-290
|
11-Weight
|
330
|
318-342
|
12-Weight
|
380
|
368-392
|
13-Weight
|
450
| |
14-Weight
|
500
| |
15-Weight
|
550
|
Tip: The sooner you start thinking and talking in grains, in the long run, the better your fly line knowledge will be. Why? Experts and most of the world other than the USA, speak and label products in grains.
Advice from the Experts
How To Choose the Right Fly Line Weight. By Lefty Kreh.
Let me begin by saying that rod manufacturers design rods for the average person to use under average conditions. So unfortunately, most fly fishermen use only one weight of line on their favorite rod.
Written on the rod blank or handle is a code number, which indicates the line that the rod manufacturer suggests is best for most customers; i.e., 6 line. To most fly anglers, this means that they should use nothing but a 6-weight line with this rod. But to get the full potential from different fishing situations, you may want to consider using several line sizes on your rod — perhaps varying as much as two line sizes from the one suggested on the rod.
Manufacturers know your rod may be used in a host of fishing situations, but they can’t judge your casting style and fishing skills. So when they place a recommended line number on your rod, it is implied that it’s for average fishing conditions. First, understand that you’re not going to damage a fly rod using fly line a little lighter or heavier than is recommended. Certainly, at times, the rod will fish better if different line sizes are used.
Match line weight to conditions:
Let me cite several examples of when you might want to use various line weights on the same rod for different fishing conditions you may encounter.
First, if you fish a swift, tumbling mountain brook, you can use a rather short leader with a dry fly. A leader of 7-1/2 feet in length would probably do the best job. But if you fish for trout with the same outfit and dry fly on a calm spring creek, beaver pond or quiet lake, that short leader could prevent you from catching many fish. While many fishermen automatically know that on calmer water they have to use longer leaders, many of them don’t really probe any deeper into "why" they need a longer leader.
It isn’t the leader’s length that’s so important. In calm water, what frightens the trout is the line falling to the surface. The longer the leader, the farther away from the fly is the splashdown of the line.
But with a longer leader, the more difficult it is to cast and there is a reduction in accuracy. Thus, a 9-foot leader is more accurate and easier to turn over than a 15-footer. Considering this, plus the fact that the splashdown of the line is what is frightening the trout, there is a simple solution. Use a fly line one size lighter than the rod manufacturer recommends. Jim Green, who has designed fly rods for years and is a superb angler, mentioned to me more than three decades ago that he almost always used a line one size lighter when fishing dry flies where the trout were spooky or the water was calm. I tried it and have routinely followed his advice. So, for example, if you are using a six-weight rod, you can drop down to a five-weight line with no problem. In fact, in very delicate fishing conditions, I often drop down two sizes in line weights. There is a reason.
Weight and speed need to vary:
Fly rods are designed to cast a particular weight of line — with a good bit of line speed. If you drop down a line size, you benefit in two ways. One, the line is going to alight on the water softer than a heavier line. Two, because it is not as heavy, it doesn’t develop as much line speed. A line traveling at high speed often comes to the water with a heavier impact than one that is moving slower. Even with a line two sizes lighter, you can still cast a dry fly or nymph far more distance than what is called for in delicate trout fishing situations. So you don’t hamper yourself at all by using a line lighter than the rod suggests. Best of all, you can now use a shorter leader, since impact on the surface has been lessened.
There is a second situation where a lighter than normal line will help you if you are a fairly good caster. The wind is blowing and you need to reach out to a distant target. Many try to solve this common problem by using a line one size heavier. The usual thinking is that a heavier line allows them to throw more weight and, they hope, get more distance. Actually, going to a heavier line means that they complicate the problem.
On a cast, the line unrolls toward the target in a loop form. The larger the loop, the more energy is thrown in a direction that is not at the target. When fishermen overload a fly rod with a line heavier than the manufacturer calls for, they cause the rod to flex more deeply, which creates larger loops on longer casts. Overloading the rod wastes casting energy by not directing it at the target.
If you switch to a lighter line, you may not have enough weight outside the rod tip to cause the rod to load or flex properly — if you hold the normal amount of line outside the rod during casting. But if you extend this lighter line about 10 feet or a little more outside the rod than you normally would for this cast under calm conditions, you can cast a greater distance into the wind. By extending the additional amount of lighter line outside the rod, you cause it to flex as if you were false casting the normal length of the recommended line size. Since the rod is now flexing properly, it will deliver tight loops, but the lighter line is thinner. This means that there will be less air resistance encountered on the cast.
If you are forced to cast a longer distance into the wind, switch to one size lighter line and extend a little more line outside the rod tip than you normally would. This means, of course, that you need to be able to handle a longer line during false casting. But the line that is lighter than the rod calls for will let you cast farther into the breeze.
Heavier line is often necessary:
There are situations where using a line heavier than the rod calls for will also aid in casting and catching fish, such as when fishing small streams for trout. Where pools are short and casts are restricted in distance, a heavier line can be just the right answer. For example, on many brook trout streams, the pool may be only 10 or 15 feet long and you are forced to use a leader that is at least 7-1/2 feet long. That means that only a few feet of your fly line — the weight that loads or flexes the rod — is outside the rod tip. When fishing where distance is very short and only a few feet of fly line are outside the rod tip, it is important to switch to a line that is heavier. For example, if you were using a rod designed for a four-weight line and had to cast most of the time at targets less than 20 feet, placing a five- or even a six-weight line on the rod would let you load the rod, and casting would be much easier.
This same principle applies when you are bass fishing in the southern swamps. Often, you are casting in small, winding creeks, or where there is a lot of brush immediately behind you. This also holds true when fishing the backcountry of Florida for Snook, where you are close to the target and back cast area is limited. If you are using a rod designed to throw an eight-weight line and you’re fishing at 30 to 40 feet from the target area and the back cast area is less than that, a nine-weight line will permit you to cast much better because the heavier line will load up the rod and let it flex.
Heavily weighted lines, like the Wet Cell III or Uniform Sink +, can and should often be used in one to two sizes heavier than the rod calls for because, for some reason, a line one size heavier seems to improve distance casting. Try one and you’ll see what I mean.
Use shooting TAPERS for greater distance
Finally, consider shooting tapers (also called "heads"), which are generally used to obtain greater distance. When casting with normal line, if you cast well, you never hold just 30 feet of line outside the rod tip to get distance. Instead, you false cast with considerably more than 30 feet of line outside. When using a shooting head, try using one that’s a size heavier than you usually do and you’ll be pleasantly surprised at the distance you gain.
So don’t limit yourself to the standard guidelines given by rod manufacturers. Experiment with different line weights for special fishing conditions. You will be pleased with the results.
Double Taper vs. Weight Forward Fly Lines…Which Is Really Better?
ST. PAUL, Minn. - Few fly line subjects have been discussed more than which is the better taper -- double taper (DT) or weight forward (WF). The answer, according to Bruce Richards, fly line product engineer for 3M Scientific Anglers, "is neither is inherently better, but one may be better than the other for you."
Richards has designed fly line tapers for Scientific Anglers for more than 20 years. There are not many in the fly fishing industry who possess Richard's knowledge on fly lines - and he shares the following on the DT vs. WF question. John Mazurkiewicz
A lot of generalizations are made about these two tapers based on outdated or incorrect information. All fly anglers have heard that double taper lines are more delicate, give better control, roll cast better, etc. In some cases, these performance features of double taper fly lines are true, but not always.
Delicacy of delivery is determined by the mass of the front part of a fly line. This is determined by line diameter (which relates directly to mass), and taper length. A line with a small diameter tip and a long taper has much less mass up front than a line with a large tip and short taper. Don't be mislead by taper length alone -- a line with a long front taper but a large tip diameter will not deliver delicately. A DT and a WF line with the same taper and tip diameter will deliver the same.
For many years, most DT and WF lines were made with the same tip diameter and front taper length so there was no difference in how they delivered, although many claimed there was. Today, many of the DT lines are actually designed specifically for use in spring creek-type fishing and do have longer tapers and/or smaller tips.
Anytime a fly line (or any product for that matter) is designed to do one thing very well it usually has a shortcoming somewhere else. Lines that are designed to be very delicate have little mass in the front to carry larger or heavier flies, and will not handle windy conditions well. It takes a better caster to throw the kind of loops it takes to make these lines perform their best. And no, DT lines are not a more "accurate" casting line-- that is entirely in the realm of the skill of the caster.
It is very true that DT lines are easier to control and roll cast at long distances than WF lines. At shorter distances, there is no difference. The key to line control and roll casting is to make sure the large diameter line belly is in the rod tip. If the small diameter running line is in the tip, it's nearly impossible to transmit enough energy through it to the belly to make the line do what you want. What many fly anglers don't consider is that WF lines control and roll cast as well as DT lines at the distances most of us fish.
Almost all WF lines have heads that are 35-40 feet long. Add a 9-foot leader and the distance to the fly from the end of the head is 44- to 49-feet. Up to this distance when both DT and WF lines control and roll cast the same. There are not many typical trout fishing situations that require longer casts. What this all means is that DT and WF lines work pretty much the same at the distances we fish most often. Certainly if someone fishes a big river that requires a good deal of long distance roll casting and mending, a DT or a WF line with a long head should be considered. Either a Mastery Series XPS or GPX double taper or Mastery Series XXD weight forward taper would work well.
Everybody knows that WF lines are better for distance than DT lines, but is that really true? Well, yes, but the difference isn't as big as you might think. Because of their small, light running lines, WF lines shoot better. But remember, this benefit starts at 44- to 49-feet when the running line is in the rod. If your fishing situation calls for many long casts, it is certainly a little easier to do with a WF line - but don't think that DT lines won't shoot. They will, just not as far.
For most fly anglers in normal fly-fishing situations, it probably doesn't make a lot of difference what taper you use. Most of us fish at distances less than 50 feet, which is where weight forward lines start to shoot better, but with less line control. Most of us don't have the need, or the ability, to roll cast longer than 45 feet.
So, how do you decide which is the right taper for you? Double taper or weight forward? For short to medium casting range situations, there is no reason not to have a DT line rigged and ready. If you are consistently throwing longer casts, you can make them with fewer false casts with a WF line. But if the need arises, you lose the ability to do long roll casts and mends. For most, it doesn't make much difference which taper is used most of the time. Base your decision on DT versus WF on how much small fly, short distance fishing you do - when a delicate DT line like a Mastery Series XPS would offer advantages, against how much fishing you do where longer casts are needed - and the advantages of a WF line.
Scientific Anglers offers taper diagrams on all its Mastery Series fly lines - providing the length of tip, front taper, belly and rear taper, and the total head length and running line length - on its web site at: www.scientificanglers.com ~ Bruce Richards, Scientific Anglers
2. Leaders & Tippets
What is a Leader? A leader is a tapered monofilament fishing line attached to your coated and colorful fly line via, most often, a loop to loop connection, having an overall length between 6ft and 15ft. Leaders can be bought pre-made, or some anglers prefer to make their own by simply buying various diameter monofilament fishing lines. See Graph.
What is a Tippet? Generally, tippet is the last 2ft of your tapered leader. Tippet sizes range between 8X and 0.015. The higher the tippet number (8X) the lower the pounds, or break strength. See Graph.
Note: To size your tippet to your fly, remember the rule of 3 or 4. For Example: #16 size hook divided by 4 equals a 4x tippet. If you were to use 3x or 5x instead of 4x, you should not have a problem.
Leader Length
|
Best suited for…
|
6 foot
|
Sinking fly lines of all types, panfish, bass, trout in tiny, brushy streams
|
7.5 foot
|
Trout in streams from 10-20 feet wide, intermediate and sinking tip lines in lakes and saltwater conditions where the fish are not terribly spooky. Also streamer fishing for trout with big flies or with heavy nymphs and big indicators
|
9 foot
|
Trout streams larger than 20 feet wide where the water is mostly riffled, or else the fish are not spooky. In salt water, fish in shallow water under bright, clear conditions.
|
12 foot
|
Trout in most lakes with floating lines. Trout in streams with flies smaller than size 16 when the water is flat, low, or very clear
|
15 foot
|
Spooky trout in extremely clear water in both lakes and rivers.
|
Tippet Size
|
Tippet Diameter
|
Approximate breaking strength in Super Strong nylon (pounds)
|
Balances with fly sizes:
|
8X
|
.003"
|
1.75
|
22, 24, 26, 28
|
7X
|
.004"
|
2.5
|
18, 20, 22, 24
|
6X
|
.005"
|
3.5
|
16, 18, 20, 22
|
5X
|
.006"
|
4.75
|
14, 16, 18
|
4X
|
.007"
|
6
|
12, 14, 16
|
3X
|
.008"
|
8.5
|
6, 8, 10
|
2X
|
.009"
|
11.5
|
4, 6, 8
|
1X
|
.010"
|
13.5
|
2, 4, 6
|
0X
|
.011"
|
15.5
|
1/0, 2, 4
|
.012
|
.012"
|
18.5
|
5/0, 4/0,3/0, 2/0
|
.013
|
.013"
|
20
|
5/0, 4/0,3/0, 2/0
|
.015
|
.015"
|
25
|
5/0, 4/0,3/0, 2/0
|
Advice
As a beginner angler, you might find yourself going through a lot of leaders. At one time in my angling career, I was going through leaders often. These days, I may use one leader per season. How? I may use a tippet ring or from the start, I may add more tippet to my leader. For example: I'll start with a 9ft 3X leader and add 2ft of 4X tippet; 9ft 2X leader and add 2ft of 3X tippet. Either way, while casting, if you find your fly not turning over, adjust your tippet size to the size of your fly.
As a beginner angler, you might find yourself going through a lot of leaders. At one time in my angling career, I was going through leaders often. These days, I may use one leader per season. How? I may use a tippet ring or from the start, I may add more tippet to my leader. For example: I'll start with a 9ft 3X leader and add 2ft of 4X tippet; 9ft 2X leader and add 2ft of 3X tippet. Either way, while casting, if you find your fly not turning over, adjust your tippet size to the size of your fly.
3. Hook Size
Tippet Size
|
Tippet Diameter
|
Approximate breaking strength in Super Strong nylon (pounds)
|
Balances with fly sizes:
|
8X
|
.003"
|
1.75
|
22, 24, 26, 28
|
7X
|
.004"
|
2.5
|
18, 20, 22, 24
|
6X
|
.005"
|
3.5
|
16, 18, 20, 22
|
5X
|
.006"
|
4.75
|
14, 16, 18
|
4X
|
.007"
|
6
|
12, 14, 16
|
3X
|
.008"
|
8.5
|
6, 8, 10
|
2X
|
.009"
|
11.5
|
4, 6, 8
|
1X
|
.010"
|
13.5
|
2, 4, 6
|
0X
|
.011"
|
15.5
|
1/0, 2, 4
|
.012
|
.012"
|
18.5
|
5/0, 4/0,3/0, 2/0
|
.013
|
.013"
|
20
|
5/0, 4/0,3/0, 2/0
|
.015
|
.015"
|
25
|
5/0, 4/0,3/0, 2/0
|
Since the above graph features typical trout hook sizes, let's take a closer look. The below picture accurately describes the hook's features, but how do we determine the size of a hook? Hooks come ins all sizes and shapes. The largest hooks range from a monstrous 18/0 to 1/0, and the smallest hooks range from 1 to the eye squinting 32.

The size of the hook is simply determined by the width of the gape (the measurement between the shank and the point).
Initially, the system may seem confusing, but always remember to start at zero. As you progress up in the numerical numbers (1, 2, 4, 6, 8, 10, 12, 14,16,18, 20, 22, 24, 26, 28, 30, 32) the gape becomes smaller, thus the hooks become smaller. As you decrease from zero (1/0, 2/0, 3/0, 4/0, 5/0, 6/0, 7/0, 8/0, 9/0,10/0,11/0,12/0,13/0,14/0,15/0,16/0,17/0,18/0) the hook gape becomes wider, thus the hooks become larger (not necessarily longer).
By now, in the above chart, you'll see how smaller or larger hooks match up with smaller or larger diameter leaders and tippets. For example, you would never match a size 2 hook with an 8X leader. Why? the diameter of the 8X tippet will not be strong enough to cast or turn-over the larger fly. Thus your casting and presentation will suffer, if not be impossible; and the likelihood of your tippet breaking increases significantly. Try it on the water...you'll understand immediately!
The 'X' Factor: Strength and Length
Your at the fly shop and you see hooks labeled Size 2, 2X/2XL or Size 4, 2X/4XL...now you are really confused. To keep things simple, all this means is the hook is stronger and has a longer shank (when compared to standard hooks noted in the above graph). To be a bit more precise, 2X simply means the hook has a thicker-stronger diameter; and the 2XL simply means the length of the shank is two times the length of a standard hook. Applications for stronger and longer hooks usually means you fishing deep for bigger fish (large streamer flies).
Converting from the world of lurers, worm and bobbers, and 8lb test line, will take some time. But once you master it, you'll soon realize how simple and effective it is.
 |
| Classic Split Cane Bamboo Rods |
By now you understand how fly lines, and matching leader-tippet to hook size are extremely important. In my opinion, the next most important step is your purchasing your fly rod. Where to start? I will approach this as though you are a beginner and you are looking for a well balanced 'starter' rod.
 |
| Modern Graphite Rods and Reels |
Design: Each fly rod has been designed to cast a specific line weight. For example: a six weight fly rod has been designed to cast a six weight fly line. The chart below is a guideline, not a rule, for balancing rod-weight, and fly size.
Rod/Line Weight
3
4 5 6 7 8 9 10 11 12 |
Fly Size Range
12-28
10-26 8-24 6-20 4-16 1/0 - 12 2/0 - 10 3/0 - 8 4/0 - 6 6/0 - 4 |
Length: Single hand fly rods range from 6ft to 10ft. Two handed rods (commonly called switch and spey) range from +/- 11ft to +/- 15ft. A typical starter, all purpose single hand rod, designed to fish for trout or bass, is a 9 ft 5 or 6 weight. For local New England waters, I would pick a 9ft 5wt. Now what 'Action or Flex," do you pick?
Action: Not all rods are the same. Each material (bamboo, fiberglass, graphite, boron) possesses physical properties which, along with proprietary manufactured tapered designs, determines the characteristics of a fly rod performance. Plus, there are entry level rods, and high end rods with both fast, medium, and slow actions. Each manufacturer has their own action indexing system and as a result, there is no set standard for measurement. For Example: An Orvis 9 ft 5 wt Helios fast action rod will feel and perform differently than a Scott S4 9ft 5wt fast action rod. Before I dive deeper into this discussion, just what are I am talking about when I use the word 'Action,' or "Flex.'
In the fly rod industry, when we use of the word 'Action or Flex,' we are referring to the bend of the rod. Technically, 'action' is defined as the relative resistance to bending as you move down the length of the fly rod shaft. The below picture clearly shows the 'bend' of a fly rod designed to be fast, medium or slow.
Let's take a closer look at the available 9ft 5wt actions:
Fast Action or Tip-Flex: due to the specific tapered design of the blank, these rods bend less, and are stiffer. Plus, they don't call them 'tip-flex' for nothing. In other words, the rod is designed to flex only from the tip-top to about 1/3 down the rod. As a result, when you catch a fish, the rod's butt and mid-section do the work for you, and your ability to feel and play the fish is entirely different from medium and slow actions rods. However, fast action rods tend to cast farther and have become the most popular action-type rod on the market today (both with beginners and advance fly fisherman). The stiffness of these rods will help you mend and pick up line easier, create tight loops with ease, create higher line speeds allowing you to punch line through strong winds, make longer cast in almost all situations with greater ease, and significantly increase your ability to cast larger flies and heavier weighted fly lines. In other words, with moderately correct casting form, the rod does much of the work for you. In Patagonia Argentina, where sustained winds of 25mph are the norm, a fast action rod, such as a 9.6ft 6wt, is a MUST have!
Medium Action or Mid-Flex: these rods bend more than fast action rods, and generally flex from the tip-top to the middle portion of the rod, or generally the 2/3 mark down the rod.The remaining 1/3 of the rod, from about +/- the middle of the rod to the rod butt, will provide the angler with a stiff feel which aides in casting and fighting fish. Despite fast action rods being the most popular, the medium action rod, in my opinion are the most versatile fly rods on the market. In the hands of a competent caster, you can do everything a fast action rod can do. If you prefer slower line speed for subtle dry-fly presentations, and a forgiving tip which allows you to play the fish and avoid tippet breaks, then I would highly recommend a medium action rod.
Slow Action or Full-Flex: Though manufacturers make slow action graphite rods, historically, when it comes to slow action rods, we tend to think bamboo and fiberglass. Now think very slow line speed and ultra sensitive tip-top protective action. A sensitive tip-top action will absorb strikes and prevent fine tippet, such as 8X, from breaking. A slow action rod is used by many small stream dry-fly fisherman who prefer delicate short distance casts looking to feel the action of a fighting fish from the tip-top of the rod, to his/her hands. However, there are a handful of old school purist who will, for example, purposely use a 9ft 9wt slow action rod (mostly for saltwater fishing because when you use heavier lines and flies, your casting stroke changes and a slower action rod enhances performance).
Note: Learning on a slow action rod, in my opinion, can be very challenging for a beginner. Why? To obtain optimal fly line and fly rod performance, an angler must be consistently patient and develop timing (as seen in a River Runs Through It). Personally, I grew up fishing a 9ft 6wt slow action fiberglass rod. As a youth, I hated it...I wanted instant gratification. But, it was the only fly rod I had, so I stuck with it. Now, as an adult, after learning how to use this tool, I cherish every moment I cast with this rod!
Final Thoughts
As a beginner, as you develop your casting stroke, it could take you several years to finally determine which flex style you prefer. To accelerate your understanding of fly rod performance, I would ask your local fly shop to provide you with a variety of rod-reel-line set-ups. If you do this make sure the rod-reel-line is properly balanced; otherwise your wasting your time. Also, don't be afraid to ask a friend to try his/her well balanced rod-reel-line. For me, I tend to favor the following actions: medium-fast, medium, and medium-slow. I also tend to line-up my rod/reel. In other words, if I am using a 9ft/5wt, I will add 6wt line to my reel and adjust the amount of backing so I don't over spool my reel (I no longer follow Mfg's guidelines for line-reel-backing amounts).
5. Fly Reels
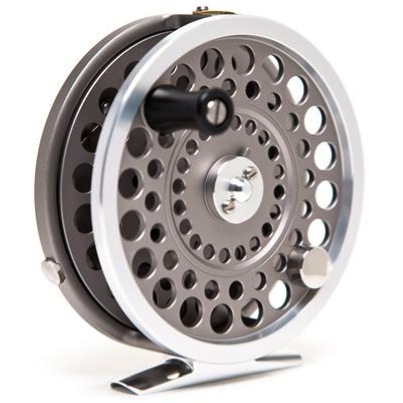
The never ending debate amongst anglers goes like this..."a fly reel does nothing but hold your backing and fly line, so don't spend a lot of money on your reel." "A fly reel does a lot more than hold your backing and fly line, so make sure you buy a good one." "Large arbor reels are better reels." Here's FCFF no non-sense take on the subject..."it depends." But before we explain and give our final say, allow us to walk you through reels 101.
Action of Fly Reels
- A single action reel is the most popular type of fly reel on the market today. This means the reel has a 1:1 retrieve ration. A complete turn of the handle equals one complete turn of the spool. Mechanically, this style of reel is simple and if made with quality parts, should last a lifetime.
- A multiplying reel has a retrieve ratio greater than 1:1. Obviously, the benefit of this feature is an angler's ability to retrieve line faster when reeling. Mechanically, they are more complicated than a single action reel, and if high quality parts are not used, then these reels can cause problems (speaking from experience).
- By the use of a trigger, not a handle, an automatic reel, automatically retrievers fly line. Mechanically, this means more moving parts, probable to high failure rates, and adds un-necessary weight to the reel. To be short and direct, do not purchase this type of reel.
Drag System
 |
| Classic Spring and Pawl Reel |
By today's standards, a spring and pawl reel is considered to be a traditional reel, representing out-dated technology. Much of that statement is true; however, I personally believe that click and pawl reels can be used in any fly fishing situation. Why? Click and pawl reels have been landing fish, from trout to tuna, for over 100 years. How? The reels are almost mechanically fail-proof, and truth be told, it's the angler...not the reel (or rod) that lands the fish! To over emphasize the point, do you need a high-tech drag system to land a 2 lb trout on a 9ft 5wt rod...absolutely NOT! The benefits of using a click and pawl reel are; it can be lighter than reels with drag systems; and the reel is designed to feed-out line smoothly which may help prevent tippet breaks. Lastly, and a personal favorite of mine, a click and pawl reel allows you to fight (palming the reel) a fish, in what I believe to be the most natural way possible. But, if you are consistently targeting large fish (+20 lb) you may want to look at reels with high-tech drag systems.
 |
| Large Arbor Reel with Cork Disc-Drag System |
High-Tech Disc-Drag reel systems are the industry rage! These type of reels, use various materials that essentially act like a brake on a car. A quick turn compresses the inner pads and your reel can now, virtually stop a truck! Another quick turn, and your drag system smoothly lets out line for fine tippet fishing applications. Not all disc drag's are made the same. Generally speaking, domestic made reels versus imports may cost more, but you'll get better engineering, better parts and over all, a lifetime of better performance. But, the question is, do you need a high-tech disc-drag reel? Based on my personal experience, and for those who are targeting smaller fish (-20 lb), the answer is NO.
Note: Before moving on, we should mention the following: a 2 lb fish in a fast moving current, with rocks and sub-merged trees, will test an angler using a light weight, e.g. medium action 4wt rod with a spring and pawl reel. Again, the choice of equipment (reels) depends on situational and personal preference factors.
Fly Reel Line Weight
It's simple, remember fly rod weight = fly line weight = fly reel weight.
For Example: 9ft 5wt = WF 5 F = 5 weight reel.
Now days, especially with medium and larger arbor reels, you may see a reel that is labeled 4/5 weight or 6/7/8 weight. This simply means that the reel has the capacity, depending on how much backing line is added, to carry multiple weight (diameter) lines. This beg's the question, can I use my 6wt reel on my 4wt fly rod. Answer: Yes, but it may feel heavy in the hand. Can I use my 4 weight reel on my 6 weight reel. Answer: in a pinch, yes, but not recommended. Overall, it is always best to match the reel weight with the rod weight.
Note: I typically line-up my reels. I do this because I like how the extra weight loads my rod. For example, I will add a 6wt line to a 9ft/5wt rod. Due to the larger diameter of the 6wt line, I will then reduce my backing so the rod-reel-line is properly balanced.
Note: I typically line-up my reels. I do this because I like how the extra weight loads my rod. For example, I will add a 6wt line to a 9ft/5wt rod. Due to the larger diameter of the 6wt line, I will then reduce my backing so the rod-reel-line is properly balanced.
Left or Right Handed Reels
Buying a reel that offers both left and right handed retrieves is optimal, and does not effect the overall performance and value of the reel. Plus, if you ever hand the rod down to a family member or have a desire to sell it, a left and right retrieve option is a must have feature. Note: Many beginners make this mistake...be sure to spool your backing and fly line properly so the spool's revolution matches a left of right handed retrieve.
Buying a reel that offers both left and right handed retrieves is optimal, and does not effect the overall performance and value of the reel. Plus, if you ever hand the rod down to a family member or have a desire to sell it, a left and right retrieve option is a must have feature. Note: Many beginners make this mistake...be sure to spool your backing and fly line properly so the spool's revolution matches a left of right handed retrieve.
Spare Spool and Large Arbor Reels
 |
| Modern Large Arbor and Spare Spool |
Spare spools are a matter of convenience and personal preference. Most fisherman inter-change spools to change from a floating line to a sinking line. However, what most fisherman fail to realize is that 95% of their time on the water, will only require floating line (depends on waters fished). So why buy an extra spool lined with sinking line, and then carry a heavy-bulky object in your vest that you rarely use? If you find yourself in a situation that requires various types of sinking lines, then you may need a spare spool with a sinking line. Personally, I do have a spare spool (only one), but I travel the world, and I fish in highly specialized waters. Overall, let's say for trout fishing, I don't find spare spools to be a must have item. To go deep, you can lengthen your leader and simply add split-shot; or you could use inter-changeable sinking tips (Poly-Leaders, for example). The downside to these methods is the casting 'feel' stroke (it may feel clunky). As I initially stated, it's a matter of convenience and personal preference. Lastly, if you do not buy spare spools when you purchase your reel, in the future, finding a spare spool that fits your reel, might become challenging.
Now days, it's hard to find anything but a large or medium arbor spool. When compared to a traditional spring and pawl reel, the overall size will be much different and the width of the spool will be wider (i.e. one hockey puck vs. two stacked hockey pucks). Though the large and medium spools may look much bigger than traditional spring and pawl reels, the over all weight might be the same. The advantages of the larger arbor reels are: ability to reel in line faster, and less coiling of the line, when stored. Other than looking cool for some folks, in my personal opinion, when fishing for smaller game, the benefits of large arbor reels, are minimal. In other words, don't expect your large arbor reel to help you cast better or catch more fish.
Note: I recommend buying reels that offer an exposed rim so that the angler may palm the reel (this may be hard to find in older spring and pawl reels). Palming is a technique where the angler gently applies pressure to the exposed rim of the spool while the fish runs. The small amount of pressure from the palm of the hand becomes your drag system.
Note: I recommend buying reels that offer an exposed rim so that the angler may palm the reel (this may be hard to find in older spring and pawl reels). Palming is a technique where the angler gently applies pressure to the exposed rim of the spool while the fish runs. The small amount of pressure from the palm of the hand becomes your drag system.
Weight of the Reel and Backing Line
When you narrow down your reel choices, I would always recommend going with the lightest, yet structurally strongest reel possible (not the strongest drag system). Why? With a light weight reel and a well balance outfit, you'll be less likely to experience hand-wrist-arm stress/fatigue. Note: beware of low cost, light weight reels made from plastic parts.
 |
| Large Arbor spooled with backing and fly line |
When you narrow down your reel choices, I would always recommend going with the lightest, yet structurally strongest reel possible (not the strongest drag system). Why? With a light weight reel and a well balance outfit, you'll be less likely to experience hand-wrist-arm stress/fatigue. Note: beware of low cost, light weight reels made from plastic parts.
If a trophy fish were to make a long run, say +200 feet and you did not have any backing attached to your 90ft fly line (standard fly line length), then you would be faced with a big problem. To counter this issue, we typically attach 20lbs or 30lbs Dacron line to our fly line and reel (30lbs Dacron is typically used for larger reels and big game fish). But, how many of us freshwater anglers (trout) can honestly say that we have had a fish run over 200 feet. The take away message: if you are fishing for smaller fish, and you want to lighten the total weight of your reel, then don't add the total manufacture recommended amount of backing.
Saltwater Reels
 |
| Large Arbor Saltwater Reel. Fish is already into the backing! |
A reel of any sort worse enemies are salt and sand! You could use your freshwater reel in saltwater conditions, but if your real is of poor quality and you do not properly clean you reel after use, it will ultimately corrode and fail. Things to look for in a good saltwater reel: high quality parts designed to take saltwater punishment, and your reel needs to hold at last 200 yards of 30lbs backing (ocean fish are big, strong and fast!). Many high-end ($) reels today have been engineered for both sweet and saltwater. But, remember to chose the lightest weight reel possible (not the strongest drag system).
Final Thoughts
I spent nearly my whole life fishing spring and pawl reels. When I switched to large arbor reels, I did not catch bigger, or more fish (but, I did spend more $ on my reels). If I lost a trophy fish on a spring and pawl reel, it felt more than okay...it felt GREAT! In fact, I would go so far as to say, that we have lost the art of fighting fish (palming, etc). We now rely on drag systems that could stop a train. Now days, for my rods #1-#6 I do not use a reel with a drag system. I believe the use of a drag on these types of rods/reels, is totally unnecessary.
Always remember, the most important equipment in fly fishing is not your reel, it's your brain and heart.
Always remember, the most important equipment in fly fishing is not your reel, it's your brain and heart.
 |
| Level Rod = BALANCE |
By now, you have read information on fly lines, fly rod actions, and fly reels. Now it's time to put it all together to achieve BALANCE.
Once again, the general rule to follow is: fly rod weight = fly line weight = fly reel weight. If this is so simple, then why do I see so many anglers with un-balanced outfits?
Avoid the follow mistakes while in a store shopping for a rod, reel, line outfit:
- Most anglers will pick up a rod, without a spooled reel on it, and wiggle and flex it. Then they'll say things like, "I like the action." Folks, sorry to say, this does very little and some would say, absolutely nothing. The only way you can effectively determine how a rod will feel and flex, is to attach an appropriately weighted reel and line, and then cast it on a lawn, or better yet, on the water. By casting a rod, you'll feel the rod's action and determine if the action is best suited for the conditions you'll be fishing; and also match the action of the rod to your preferred casting stroke (i.e. tight loops vs. open loops). You'll also have the best chance to determine the balance of the outfit. However, a problem associated with this process is that many stores will attach a fly reel and fly line that is not properly balanced for the rod. In fact, many stores will put on a low-cost heavier reel and cheap line because they really don't like folks test driving expensive light weight reels. Bottom line, if you plan to fish with this outfit for many years, if not a lifetime, you should test your rod with a balanced rod-reel-line set-up. PS. I let all my students test my personal fly rods. It gives them a chance to feel what perfect balance is all about. The feedback from students is nothing less than amazement (they all want to buy my set-ups).
- After the beginner angler has flexed the rod while in the store, he/she will then review potential reel choices. Most people will make their choice based on the retailers suggestions and their budget. Chances are, the conversation will be dominated by the strength of the drag system and the features of large arbor spools. Another note worthy comment, even if you wanted something different, these days, most stores only carry large arbor reels. Here's the truth, when trying to achieve a balanced outfit, the drag strength and the arbor size, has very little to do with it (especially with rods 1wt-6wt). Instead, focus on the weight of the reel, the quality of the parts (screws, plastic vs. steel, etc), and the ease of use (easy turning knobs, easy changing spare spools, etc). For example: I have used rods and reels, that would be considered heavy by today's standards, that were perfectly balanced, and caused no casting fatigue. On the other hand, I have used super light weight rods, with modern large arbor (heavier) reels that were not balanced well (caution: with poor casting mechanics, this may cause casting fatigue, and even injury).
- You have picked out your rod, then your reel, and now it's time to buy fly line. For some folks, this is when sticker shock sets in. As a result, most people end up buying the cheapest line possible. I would strongly recommend reversing the process entirely. In other words, buy the highest quality line possible. But, before buying your line, focus on the water that you'll be fishing, and any factors that would lead you one way or another (WF vs. DT, Floating vs Sinking, etc). By doing so, you'll simultaneously determine the weight of both the fly line and fly rod (and, possibly the action of the fly rod). Once you have picked out your fly line, you now have the ability to selectively choose which rod and reel are weighted properly to give you the desired feel and balance. Be vigilant about achieving balance because, for example, a 5wt rod and a 5wt reel, although suggested by the manufacture to match properly, may not achieve perfect balance. Even complete rod-reel-line outfits marketed and sold by top manufacturer's, may not achieve optimal balance. In the end, if you can place one or two fingers at or near the end of the cork grip (away from the reel), and achieve a level rod, then your entire outfit should be balanced.
Again, focus on perfect balance. Do not under estimate the need for BALANCE. Even though your rod-reel-line does not weigh much, if you you do not have optimal balance, and if your casting mechanics are not perfect, you may encounter problems with stress, fatigue and ultimately, you may injure your body (especially with rods over 6wt).
How I achieve perfect balance with my single handed fly rods:
- I use light weight click-pawl reels on rods 1-6wt (no drags). I believe the need for a drag system on these reels is absolutely unnecessary. On rods 6wt-10wt, I use mid-arbor reels because I am not convinced the function/performance and the extra $ for large arbor reels is necessary.
- I generally pick the lightest reel and size it one size down. For example: On a 9ft 5wt rod, I will use a 4wt reel. I will then add 6wt line to this set up. Due the larger diameter of the 6wt line and the smaller arbor of the 4wt reel, I will need to add less backing than the manufacturer's recommended guidelines. With my method, to achieve perfect balance, it may take several attempts of spooling and un-spooling line. For me, achieving perfect balance is worth the extra time and effort.
 |
The following are MUST know for fly fishing
- Arbor: backing line to spool
- Albright: backing line to fly line
- Nail Knot: fly line to monofilament
- Perfection Loop: monofilament to leader
- Double Surgeon Loop: monofilament to monofilament
- Double Surgeons: leader to tippet
- Improved Clinch: tippet to hook
Arbor
Albright
Nail
Perfection Loop
Surgeons Loop
Double Surgeons
Improved Clinch
Saltwater Knots
A saltwater set-up (backing, fly line, leader) is identical to the set-up posted above. However, as you begin to use larger diameter monofilament fishing line, and as you tie your monofilament leader to a hook, the clinch knot, may not seat and bite properly. Therefore, the use of the clinch knot is not recommended when fly fishing in saltwater. When attaching a fly to a leader, the preferred saltwater knots generally are loop knots. Why? One, they are easier to tie and hold excellent break strength. Two, loop knots are the preferred knot when fishing flies that mimic small and large bait fish. In other words, when the fly is in the water, the open loop allows the fly to have more natural action. Just be sure to keep your loop size to a minimum. By doing so, you won't spook wary fish.
Non-Slip Mono Loop
Code of Angling Ethics
 Angling ethics begin with understanding and obeying laws and regulations associated with the fishery. Fly anglers understand that their conduct relative to laws and regulations reflects on all anglers. Angling ethics begin with and transcend laws and regulations governing angling and the resources that sustain the sport.
Fly Fishing Safety
The opportunity to participate in the sport of fly fishing is a privilege and a responsibility. Fly anglers respect private property and always ask permission before entering or fishing private property. They seek to understand and follow the local customs and practices associated with the fishery. They share the waters equally with others whether they are fishing or engaging in other outdoor activities.
Fly fishers minimize their impact on the environment and fishery by adopting practices that do not degrade the quality of the banks, waters, and the overall watersheds upon which fisheries depend. These practices include avoiding the introduction of species not native to an ecosystem, and cleaning and drying fishing gear to prevent the inadvertent transport of invasive exotics that may threaten the integrity of an aquatic ecosystem. In simplest terms, fly anglers always leave the fishery better than when they found it.
Fly anglers endeavor to conserve fisheries by understanding the importance of limiting their catch. "Catch and release" is an important component of sustaining premium fisheries that are being over-harvested. Fly anglers release fish properly and with minimal harm. They promote the use of barbless hooks and angling practices that are more challenging, but help to sustain healthy fish populations.
Fly anglers do not judge the methods of fellow anglers. Fly fishers share their knowledge of skills and techniques. They help others to understand that fly-fishing contributes to sound fisheries conservation practices.
Fly anglers treat fellow anglers as they would expect to be treated. They do not impose themselves on or otherwise interfere with other anglers. They wait a polite time, and then, if necessary, request permission to fish through. They may invite other anglers to fish through their positions. Fly fishers when entering an occupied run or area always move in behind other anglers, not in front of them whether in a boat or wading.
Fly anglers when sharing the water allow fellow anglers ample room so as not to disturb anyone's fishing experience. They always fish in a manner that causes as little disturbance as practical to the water and fish. They take precautions to keep their shadow from falling across the water (walking a high bank).
When fishing from watercraft fly anglers do not crowd other anglers or craft. They do not block entrances to bays or otherwise impede others. Fly anglers do not unnecessarily disturb the water by improperly lowering anchors or slapping the water with paddles or oars.
Fly anglers always compliment other anglers and promote this Code of Angling Ethics to them whether they fish with a fly or not.
The following is a shortened version suitable to be carried by the angler:
The following is a shortened version suitable to be carried by the angler:
- Fly anglers understand and obey laws and regulations associated with the fishery.
- Fly anglers believe fly fishing is a privilege and a responsibility. Fly anglers conserve fisheries by limiting their catch.
- Fly anglers do not judge fellow anglers and treat them as they would expect to be treated.
- Fly anglers respect the waters occupied by other anglers so that fish are not disturbed
- When fishing from a watercraft, fly anglers do not crowd other anglers or craft or unnecessarily disturb the water.
- Fly anglers respect other angling methods and promote this Code of Angling Ethics to all anglers.
Final Thoughts
I am not perfect. Throughout my life, I have made many angling ethical mistakes (especially when I was a young boy). I am 46 years old now, and for the past 15 years of my life, I have been evolving as an angler. For example, I no longer care how big and how many fish I catch. I care more about the emotional experience that fly fishing offers. For those of you who are not in the know, the mental and spiritual process of fly fishing is more than rods-reels, tight loops, and catching big fish. It's an amazing experience that allows you to create a union between you, nature and your fellow angler; not conquer and kill nature. The decision is yours to make.

Hypothermia vs. Hyperthermia
The below information was written for 'all' possible weather conditions.
Hypothermia is a condition in which an organism's temperature drops below that required for normal metabolism and bodily functions. In warm-blooded animals, core body temperature is maintained near a constant level through biologic homeostasis. But, when the body is exposed to cold, its internal mechanisms may be unable to replenish the heat that is being lost to the organism's surroundings. Hyperthermia, in its advanced state referred to as heat stroke or sunstroke, is an acute condition which occurs when the body produces or absorbs more heat than it can dissipate. It is usually caused by prolonged exposure to high temperatures. The heat-regulating mechanisms of the body eventually become overwhelmed and unable to effectively deal with the heat, causing the body temperature to climb uncontrollably. Normal or Core Body Temperature is 36.8°C (98.2°F). Hypothermia can be divided in three stages of severity.
Three Stages of Hypothermia
Stage 1:
Body temperature drops by 1-2°C (1.8-3.6°F) below normal temperature (35-37°C or 95-98.6°F). Mild to strong shivering occurs. The victim is unable to perform complex tasks with the hands; the hands become numb. Blood vessels in the outer extremities constrict, lessening heat loss to the outside air. Breathing becomes quick and shallow. Goose bumps form, raising body hair on end in an attempt to create an insulating layer of air around the body (which is of limited use in humans due to lack of sufficient hair, but useful in other species). Often, a person will experience a warm sensation, as if they have recovered, but they are in fact heading into Stage 2. Another test to see if the person is entering stage 2 is if they are unable to touch their thumb with their little finger; this is the first stage of muscles not working.
Stage 2:
Body temperature drops by 2-4°C (3.8-7.6°F). Shivering becomes more violent. Muscle miss-coordination becomes apparent. Movements are slow and labored, accompanied by a stumbling pace and mild confusion, although the victim may appear alert. Surface blood vessels contract further as the body focuses its remaining resources on keeping the vital organs warm. The victim becomes pale. Lips, ears, fingers and toes may become blue. •
Stage 3:
Body temperature drops below approximately 32 °C (89.6 °F). Shivering usually stops. Difficulty speaking, sluggish thinking, and amnesia start to appear; inability to use hands and stumbling is also usually present. Cellular metabolic processes shut down. Below 30 °C (86.0 °F), the exposed skin becomes blue and puffy, muscle coordination becomes very poor, walking becomes almost impossible, and the victim exhibits incoherent/irrational behavior including terminal burrowing or even a stupor. Pulse and respiration rates decrease significantly, but fast heart rates can occur. Major organs fail. Clinical death occurs.
Hypothermia Treatment:
Treatment for hypothermia consists of drying, sheltering, and gradually warming (making sure to not rub the patient's body, to warm with blankets and, if possible, to transfer your own body heat). While blankets help a person retain body heat, they are not sufficient to treat hypothermia. It is vital that the core of the body is warmed first or else the cold blood will be forced towards the heart and may cause death. In the field, a mildly hypothermic person can be effectively re-warmed through close body contact from a companion and by drinking warm, sweet liquids. Moderate and severe cases of hypothermia require immediate evacuation and treatment in a hospital. In hospital, warming is accomplished by external techniques such as heated blankets for mild hypothermia and by more invasive techniques such as warm fluids injected in the veins or even washing of the bladder, stomach, chest and abdominal cavities with warmed fluids for severely hypothermic patients. These patients are at high risk for arrhythmias (irregular heartbeats), and care must be taken to minimize jostling and other disturbances until they have been sufficiently warmed, as these arrhythmias are very difficult to treat while the victim is still cold.
Wind Chill & Frost Bite:
Wind chill is the apparent temperature felt on exposed skin, which is a function of the air temperature and wind speed. The wind chill temperature is always lower than the air temperature, except at higher temperatures where wind chill is considered less important. In cases where the apparent temperature is higher than the air temperature, the heat index is used instead.
Frostbite is the medical condition whereby damage is caused to skin and other tissues due to extreme cold. At or below 0º C (32°F), blood vessels close to the skin start to narrow (constrict). This helps to preserve core body temperature. In extreme cold, or when the body is exposed to cold for long periods, this protective strategy can reduce blood flow in some areas of the body to dangerously low levels. The combination of cold temperature and poor blood flow can cause severe tissue injury by freezing the tissue. Frostbite is most likely to happen in body parts farthest from the heart and those with a lot of surface area exposed to cold. The initial stages of frostbite are sometimes called "frostnip". If frostbite is not treated immediately then the damage and the frostbite become permanent. Nerve damage will occur due to oxygen deprivation. Frostbitten areas will turn discolored, purplish at first, and soon turn black. After a while nerve damage becomes so great that feeling is lost in the frostbitten areas. Blisters will also occur. If feeling is lost in the damaged area, checking it for cuts and breaks in the skin is vital. Infected open skin can lead to gangrene and amputation may be needed.


Frost BiteTreatment:
To treat frostbite move the victim to a warm location and seek medical help. Soak frostbitten areas in warm (not hot) water or, if in wilderness, warm by contact with the skin of a non-frostbitten person. Continue until the victim has regained sensation and movement in the afflicted region; this often follows great pain as the nerves thaw. Never rub, slap, or shake the stricken region as ice crystals in the frostbitten skin will damage surrounding tissue. For frostbite in the feet, keeping feet in warm saline water will provide relief. Follow the treatment with a period of constant warmth: refreezing following thawing worsens the damage.
How to Prevent Heat Loss & Reduce Exposure to Cold/Wind:
1) Insulation: Cotton vs. Synthetic/Wool Fabrics
Wearing cotton in cool/cold weather is a particular hypothermia risk as it retains water, and water rapidly conducts heat away from the body. Even in dry weather, cotton clothing can become damp from perspiration and chilly after the wearer stops exercising. Synthetic and wool fabrics provide far better insulation when wet and are quicker to dry. Some synthetic fabrics are designed to wick perspiration away from the body. Last, poor circulation can cause heat loss. So, tight clothing or boots, cramped positions, fatigue, certain medications, smoking, alcohol use, or diseases that affect the blood vessels, such as diabetes can cause poor blood circulation.
When dry, down feather insulation is among the best in the world. However, when wet, down feathers will lose almost all insulation properties and take more time to dry than wool or poly- insulates such as sleeping bag material and poly-synthetics such as Polar Fleece.
3) Wind and Weather Proofing
Whether we are exposed to cold or warm weather, our number one priority is to protect our skin and insulate our bodies. You have many modern “high tech” options such as Poly/Nylon weave with a Gore-Tex type material. This type of outer shell material offers the following: strength, light weight, windproof, waterproof and breathable performance. Traditional protective clothing such as rain coats, down jackets, or heavy wool jackets work well but they all come with pro’s and con’s.
4) Layering System
For insulation and barrier protection, all outdoor enthusiast and experts agree that layering is the best method. By layering your clothes, you are able to add or subtract clothing when necessary. Ultimately, the key to a good layering system is dependent on each person’s knowledge of their own body performance in different climates, education of materials available for purchase and real world experience. For instance, Polar Fleece is available in 100, 200, 300 weight (typically, the higher the number the more insulation offered). But, a heavier weight layering system may not provide you the best insulation system available. Why? While active, a heavier weight layering system may lead to excessive perspiration may which will lead to wet clothing, which may lead to body heat loss.
- Feet: Water proof/insulated boots or rubber insulated boots. Gators. Poly/Nylon and wool sock combination. Extreme cold: down bootie inserts or fur products.
- Body: (1-2) Layers of poly/synthetic underwear followed by light weight (100) polar fleece and wool.
- Internal Shell: light weight poly shell, down or fleece.
- External Shell: Synthetic “high tech.” 5. Hands: Waterproof outer shell. Inner fibers wool and down mittens or gloves.
- Head & Neck: Windproof fleece, regular fleece and wool hats, wool scarf. Why wool scarf’s? Great back-up system to warm hands.
- Eyes: Polarized glasses or ski goggles.
- Face & Lips: SPF skin lotion.
- Note: Under normal cold conditions, and while physically active, I find the combination of fleece/poly and wool products work best. However, in extreme cold conditions, when I am not physically moving, I find fur products (hat, gloves) and more down products, keep me warmer.
Walk-Wade Safety
If you want to be safe and dry, get a wading staff! Buy one or make one, just get one; it could be the best investment you make.